Ginger Zephyr ALM Integration
Ginger comes with seamless integration with Microfocus ALM Octane, and this document comes to explain how to use the integration functionalities.
Current supported functionalities are:
- Import Octane Test Suite into Ginger and automatically converting it to Ginger Business flow which will be ready to be automated or even execute in case it’s TC’s were already automated before by Ginger
- Export Ginger Business Flow to Octane - each one of the Business Flow Activities Group will be export to Octane Application Module as Manual Test Case item and a Test Suite item will be created in ALM Application Module containing all the relevant Octane Test Cases which were exported
- Export imported Ginger Business flow execution details back to Octane and reflect the execution status in the matching Octane Test Suit Run status
Pre-requisite
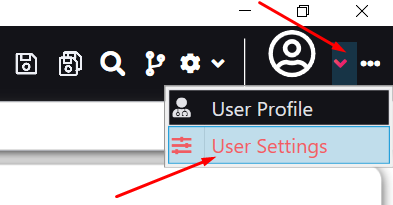
- Ensure 'Show enterprise feature' is selected & saved in Ginger under 'Users Settings option'

Connect Ginger to Zephyr
To set ALM connecting details in the Ginger application please follow below steps:
- Click on the ‘Share Operations’ button.
 Integration_files/image80.png)
- Select “ALM Connection Settings”
- Select ALM type – Zephyr using the radio buttons
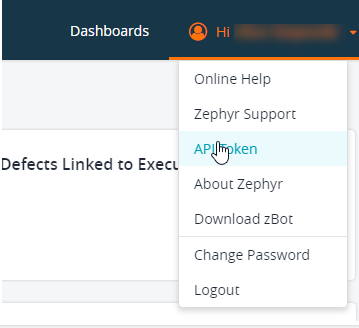
- A token is required to connect t o the Zephyr. Below is the screenshot for creating Token
- Enter all the details and click on Test ALM Connection. When passed, click on Save Project Mapping to save the details.
 Integration_files/image81.png)
Note: All Ginger – ALM interaction will try to use saved ALM configuration in Ginger, If in any case the saved configurations are incorrect or Ginger could not establish a connection to ALM, the “ALM Connection Settings” page will be shown and the user will need to enter/re-enter ALM configurations and test them before continuing.
Configure ALM Items Fields
Ginger allows configuring the ALM Test Case and Test Set items fields’ value to be updated when doing export from Ginger to ALM.
For configuring the items fields values:
- Click on the “ALM Items Fields Configuration” button from the “Share Options” menu.
 Integration_files/image82.png)
- Click on the “Refresh” button (near the search) to refresh ALM Items Fields Configurations from ALM
 Integration_files/image83.png)
- Select a value from the list or set the value (in case of the free text field) in the “Selected Value” column
- Click on the Mandatory column to sort by Mandatory values so that you do not miss any mandatory fields.
- Click on the “Save” button to save the configurations.
Import ALM Test Set to Ginger
Ginger support importing ALM Test Set which was created manually in ALM or automatically by the Design Console (ATS) application and converting it
into Ginger Test Set (Business flow) which will be ready to be automated or execute (assuming automation was already created for its TC’s).
For performing ALM Test Set import please follow the below steps:
- Open the Ginger Solution tab which loaded with your Ginger Solution
- Right-click on the Business Flows node in the Automate tab and select “Import” ->“Import ALM Test Set”
 Integration_files/image84.png)
- According to ALM type, Window with the connected ALM project Test Lab tree will be loaded. Select the ALM Test Set you want to import and click on the “Import Selected” button.
 Integration_files/image85.png)
- The ALM Test Set will be imported and converted into a Ginger Test Set with the same.
- After the Test set is imported, below is the screen on how it looks in Ginger.
 Integration_files/image86.png)
Export Business Flow to ALM
Ginger allows exporting a Ginger Business Flow to ALM
- Export Activities Groups to ALM Test Cases- each one of the exported Business Flow Activities Groups will be exported to an ALM Test Case item in ALM Test Plan
 Integration_files/image87.png)
- All of the created ALM Test Cases will be added to the Business Flow to represent the execution flow
- Right-click the Business Flows to export and select the “Export to ALM” option. It will export the selected Business Flow to the ALM.
 Integration_files/image89.png)
- To export multiple flows, Right-click the Business Flows folder and select the “Export All to ALM” optionto export all business flows under that folder
 Integration_files/image88.png)
- After exported then a Successful message is displayed.
 Integration_files/image90.png)
- Refresh the ALM. Users will able to the exported item in the ALM.
 Integration_files/image91.png)
Manual Mapping of entities
Manual mapping is needed in case the Ginger Business Flow and the matching ALM Test Set are both already exists in the systems.
In this case, the automatic Export (from selected Ginger Business Flow into new automatically created ALM Test Set) or Import (Ginger Business Flow is been created automatically based on selected ALM Test Set) can’t be used and manual mapping of the entities is needed.
The mapping has been done for allowing exporting the execution results from Ginger to the matching entities in ALM
What is mapped ?
Ginger Business Flow has been mapped to ALM Test Set (in some ALM’s it been called Test Plan/ Test Suite)
The mapped Business Flow Activities Groups are being mapped to the mapped ALM Test Set Test Cases.
For each mapped Activities Groups, each Activities are being mapped to the matching Test Case Steps
Manual Mapping Steps
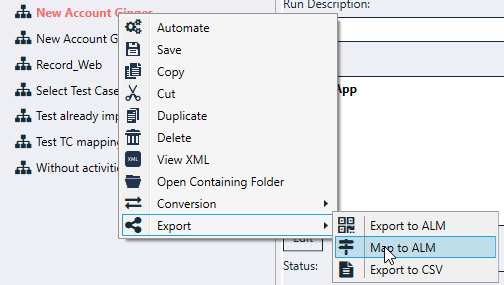
Select “Map To ALM”
- Right click selected “Business Flow” from Business Flow tree and select “Map to ALM”
- If ALM connection already defined, then default ALM connection will choose for mapping process otherwise user will ask to set connection details.
- Map To ALM wizard will open.
- Click Next to display “Test Set Mapping” page.
Test Set Mapping page
- ALM Planning Tree Display
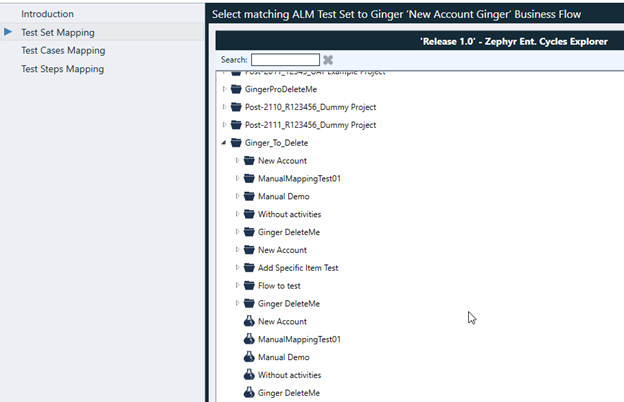
- Choose a Test Set that has not “Already Imported”

- Click “Next” button to map selected Test Set to Business Flow.
- Next page will be displayed “Test Cases Mapping”
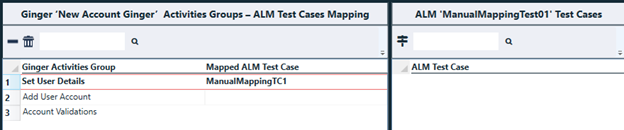
Test Case Mapping page
- Left side page: “ALM Test Case Mapping” table
- Table has two columns
- “Ginger Activities Group” – selected Business Flow activities Groups,
- “Mapped ALM Test Case” – Mapped Test Case to selected Activities Group
- Table Operations
- Unmap selected mapped Test cases

- Unmap all mapped test cases

- Unmap selected mapped Test cases
- Table has two columns
- Right Side Page: “ALM Test Cases” table
- The table display All Test Cases of the selected Test Set
- Table Operation:
 Map selected Test Case to Selected Ginger Activities Group.
- User will map Test Case to Activities Group by drag & drop or using icons
- After user mapping Test Cases to Activities Groups, Click “Next” moving for next page – “Test Steps Mapping”
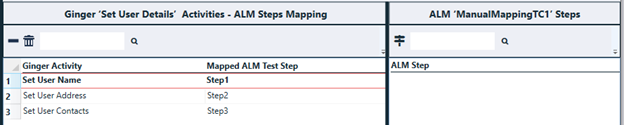
Test Steps Mapping Page
- Top of page: “Ginger Activities Groups & ALM Test Cases – Steps Mapping Status”
- Display Mapped Test Cases to Activities Group and Steps mapping status
- Bottom Right-side page:“ALM Test Case Steps” table
- The table display All Test Steps of the selected Test Case
- Table Operation:
 Mapped selected Test Step to Selected Ginger Activity
- Bottom Left-side page: “Ginger Activities Group Activities – ALM Step Mapping” table
- The table has two columns
- “Ginger Activity” – selected Activities Group activities
- “Mapped ALM Test Step” – Mapped Test Step to selected Activity
- Table Operations
- Unmap selected mapped Test steps
- Unmap all mapped test steps
- Unmap selected mapped Test steps
- The table has two columns
- Initially steps will be mapped to activities in their order as default
- User will map Test Step to Activity by drag & drop or using icons
- Steps Mapping Status will be updated automatically upon the mapping
- Completed – All Steps mapped to Activities, No Steps stayed unmapped.
- Warning – Partial mapping, some steps mapped.
- Error – No step mapped
- After user mapped Test Steps to Activities, click “Finish” saving mapping
Update Mapped Test Set and/or Test Cases and/or Steps
- Mapped Test Set name and id will display
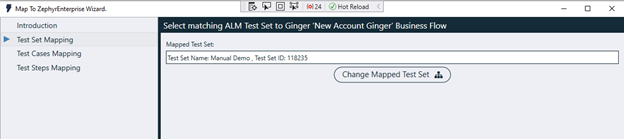
- To Change Mapped Test Set Click on “Change Mapped Test Set” to select new Test Set and Go to Test Steps mapping section
- To update mapped Test Cases and/or Steps click “Next” – Mapped data will be displayed , change your mapping and click “Finish” to save
In case the executed Ginger Business Flow was originally imported from ALM Test Set or it was exported to ALM Test Set then the user can export the execution results to ALM.
Export Execution Results to ALM
Exporting execution results to ALM from Automate tab
- Load the relevant Ginger Business Flow into Automate tab
- Run the Ginger Test Set in “Run Flow” mode.
- Once execution is done the user will get the “Test Set Execution Summary” window with a summary of the execution results.
- For exporting the results to ALM user can click on “Export Execution Details”
 Integration_files/image92.png)
Exporting execution results to ALM from Runset tab
- Open Run Set tab
- Add Ginger Set and drag & drop Ginger Business Flows to it
- Click on the Run Set Configurations button
- Add new “Add Publish Execution Result to ALM Operation” Run set Action
- Click on the Run button
- Execution details will be exported to ALM according to Run Set configurations
 Integration_files/image93.png)
Automate ALM TC & Add it to Ginger Repository
Once the user has imported ALM Test (to a Business Flow) or exported Ginger Business Flow to ALM he can automate the Ginger Activities Group andadds them to the Ginger Solution repository so they will be reused the next time those ALM TC’s will be used in other Tests that will be imported to Ginger
For automating an ALM TC & add it to the Ginger repository please follow below steps:
- Import ALM Test Set into Ginger
- Double click on it to go to the “Automate” tab
- Record or manually add the automation Actions for the relevant ALM TC Steps matching Ginger Steps
- Test and make sure the Ginger Steps have been executed as expected.
- Mark the “Automation Status” of the automated Ginger Steps to “Automated” in all the Activities of the Business Flow.
 Integration_files/image99.png)
- This makes the Business Flow fully automated
 Integration_files/image100.png)
Add the Activity Group (Test Case in ALM) to the Solution Shared Repository by:
- Go to the Automate tab by double-clicking on the Business Flow
- Click on the “…” near the Activity Group
- Select the “Add Activities Group to Shared Repository” option
- All the details in it get added to the Solution Shared Repository
- Note: In case the Ginger Test Case or one of its Ginger Steps already exists in the Repository the user will be asked if he wants to overwrite the existing one.
 Integration_files/image101.png)
8. The Shared repository wizard is displayed. Click on the Next button, verify the details and then click on the Finish button.
 Integration_files/image102.png)
9. You can view it under the Resources-> Shared Repository tab.
 Integration_files/image103.png)
Note: For reflecting the automated TC’s in the Design Console (ATS) application the user will need to Check-In the automated items (Ginger Test Cases & Ginger Steps) to the Source Control (SVN).