Ginger - UFT Mobile Lab Integration Guide
Ginger comes with seamless integration with Micro Focus UFT Mobile Lab, and this document comes to explains how to use the integration functionalities.
1. What Is UFT Mobile
Micro Focus UFT Mobile provides an end-to-end quality lab of real devices and emulators that help you test, monitor, and optimize your mobile apps for an enhanced user experience.

The UFT Mobile environment consists of the following components:
|
Component |
Function |
|
UFT Mobile Server |
This is a single web server that:
|
|
External PostgreSQL database |
You can connect UFT Mobile to an existing external PostgreSQL database. This allows your organization to manage and utilize existing DB resources. You specify this option during installation. For details, see UFT Mobile - Windows Installation (on-premises) or UFT Mobile- Linux Installation (on-premises). |
|
Connector |
The connector is a lightweight piece of software for connecting devices to UFT Mobile, which can be installed together with the server (embedded connector), or as a standalone component. You can install the connector on multiple machines in distributed locations, or on your testing-tool machine. For more details, see Install the connector on a Windows machine, Install the connector on a Linux machine, or Install the connector on a Mac Machine. The connector manages the physical USB connection to the device, and the logical state machine on top of it. It maps the ports to connect to the device over USB and manages the remote screen viewer stream from the device to the tool. It receives lifecycle events from the USB library such as device connected or device disconnected, Agent finished installing, and Agent started. It transfers these events to the UFT Mobile server for adding the device to the pool. The connector is also responsible for installing and uninstalling apps on the device. |
|
Test devices accessed via connectors |
These are the devices (smartphones/tablets) on which the tests are run. The following applications are copied to the test devices: The UFTM Agent, which manages commands to the AUT, to the OS (control outside a specific app), and to the remote screen viewer server that supplies the UI and remote control for the testing-tool clients. The AUT – Application under Test. |
|
SV Lab |
SV (Service Virtualization) Lab is an environment virtualization toolkit for virtualizing real services in areas that would be otherwise difficult to test. The SV Lab is deployed inside UFT Mobile, ready to run Service Virtualization simulations. |
|
NV Test Manager |
Network Virtualization is an optional component for testing apps running under different network conditions. Network virtualization emulates real-world conditions by imposing impairments and constraints in your testing environment during the software testing process, thereby improving software testing accuracy. |
2. UFT Mobile Server Prerequisites & Installation
There are some prerequisites for the UFT Server installation and they vary to the diffrent Operation Systems.
In The link you can see the prerequisites for each OS: Link.
3. UFT Mobile Connector Prerequisites & Installation
The connector is a lightweight piece of software for connecting devices to UFT Mobile, which can be installed together with the server (embedded connector), or as a standalone component. You can install the connector on multiple machines in distributed locations, or on your testing-tool machine.
Here you can find the prerequisites and how to install UFT Connector: Link.
Here you can download the necessary files for UFT Connector and UFT Mobile Server: Link.
4. UFT Mobile Advanced Features
Users and Workspaces
-
When logging into UFT Mobile as a shared space administrator, you have access to the MANAGEMENT tab of the Administration menu
 . Here you can define and manage workspaces and manage users. This menu is visible only to users with a shared space admin role.
 You can create multiple workspaces within your shared space. Workspaces are individual work areas within your lab. Create workspaces to segregate or share applications and devices between specific groups of users.
You can create your own custom workspaces, according to the needs of your organization. For example, you can define workspaces according to specific geographical areas, or by company division or team.
As a shared space admin, in Lab Management section in the left panel, you will see all devices, all apps, and all users with the names of the workspaces that are associated with them. Devices and apps in Shared assets are available to all users.

- Link to Lab and workspace management documentation: Workspaces documentation.
Apps Management
- The APPS menu provides visibility and control of applications in the mobile lab. Upload a new app, see information about apps that have already been uploaded, or delete apps.

-
Upload an app in one of the following ways:
-
For all users: Click the APPS tab. In the APPLICATIONS pane click Upload (list view) or Upload application
 (card view). Select the app.
 -
For admins only:
-
In Administration
 , click the MANAGEMENT tab.
 -
In the left pane, click Lab Management.
-
Select ALL APPS to view all the apps in your lab.
-
Click the Upload button and specify the path to the app and select a workspace.
-
Click UPLOAD.
-
Link to Lab and App management documentation: App management documentation.
Device View and Control
-
When opening a device remotely from the lab, you can interact with the device using the actions and features available in the device access window. You can also perform exploratory testing sessions on a device. These sessions can be recorded.
You can access a device remotely either from the Lab console, or using one of the testing tools that integrates with UFT Mobile.
-
To open a device remotely:
|
UFT Mobile lab |
Click  while hovering over a device in Card view, or select a device and click while hovering over a device in Card view, or select a device and click  Open device remotely in the toolbar in List view. Click the List Open device remotely in the toolbar in List view. Click the List  and Card view and Card view  buttons in the upper right corner to toggle between the views. buttons in the upper right corner to toggle between the views. |
|
Testing tools |
With tools that integrate with UFT Mobile such as UFT One, Sprinter, and TruClient, access a device by beginning your record or replay session. |
- Interact with the device using the actions in the toolbar next to the device, and the options in the panels on the left and right-hand side of the device access window. You can collapse the panels, change the order of the tabs at the top of the panel, and drag and drop tabs from one panel to another.

Use the toolbar next to the device to interact with the device during the capture or replay session, or when idle. The simulation options enable you to perform common event simulations. Note that some simulations are not available when conducting exploratory testing from the Lab console, and are only available when accessing the device remotely with a supported testing tool.
Link to Device access window documentation: device access window.
5. Ginger Agent Creation for UFT Mobile
How to Configure Native\Web Connection
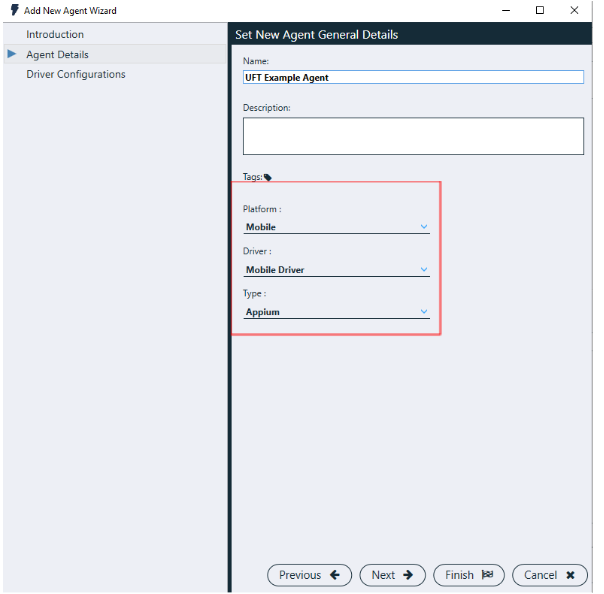
- First, in Ginger go to Configuration -> Agent and click on the button:

- Choose the Mobile Platform as follows:
-
The Appium Server configuration should be the UFT Mobile URL (including the port number):

We will take that URL and put it here:

Then, to use a UFT Mobile Device, choose “MF UFTM Lab” (it will automatically add the desired capabilities for connecting to a UFT Mobile Device):

Keep on following the steps to fill those capabilities.
Then, choose the platform (Android\iOS) and application type (Native\Hybrid or Web).
How to Select the App
-
For having basic app (Settings app) no need to change anything.
To select an App from the UFT App management you will need to specify the appPackage and the appActivity capabilities.
In UFT Mobile you can see this here:

How to Select the Device
There are 2 ways to select the device:
-
Specify exact udid: each device has a unique udid. If you want a specific device go to the device lab and see the udid of the devices:

- Take the desired udid and put it in the agent configuration:

2. Wildcard: You can use a wildcard (*) to specify the OS required. You can specify a enumeration
symbol, such as <, >, <=. >=, and =.
For example, "platformVersion", ">5.0.1".
Connection Options
There are 2 options of connection to a UFT Mobile device:
-
Connecting with an “Access Key” with the following steps:
-
In order to create the access key, you will need to go to Administration:

-
Press on “ACCESS KEYS” and then on the “+” button:

-
Fill in the “Name’ of your access key, Type (for connecting to a UFT device select “execution”), Description (optional), Expiration Date and press “Generate”:

-
You will need the following information:

-
Fill in the capabilities table at the Agent page as follows:

2. Anonymous Connection:
-
In order to enable anonymous connection, you will need to go to Administration:

-
Press “SETTINGS” and search on the left pane for the “Appium Options”:

-
Change the “Anonymous access” to “Yes”:

-
Fill in the capabilities table on the Agents page as follows:
 As you see, you can drop off the ” uftm:oauthClientId” and ” uftm:oauthClientSecret” capabilities because you can now connect without authenticating.
Link to UFT Mobile Appium Capabilities here.
For the full capabilities explanation, see “Mobile Appium Agent” guide.
UFT Mobile Troubleshooting
Install Connector on MAC tips:
-
During installation of the Connector set the IP of the MAC which is accessible to other machines in the Amdocs network.
Get the IP using the "ipconfig -a" command
## How to get the IP on Mac:
Pull the IP from Mac System Performances/Network
Or by opening Terminal and typing
ifconfig -a

2. When need to load the Server Key file, so place the file under user/Pictures folder, from some reason only from there is allows to see the file and select it
3. For connector process not to be stopped need to set below setting:
(on MacMini this is under "Power Saver" section)

4. How to restart/stop/start Connector on Mac:
-
- sudo /Users/UFTM/UFTM_service restart
- sudo /Users/UFTM/UFTM_service start
- sudo /Users/UFTM/UFTM_service stop
- Then provide machine user password
- Note: it is better to do Stop and then Start than Restart
5. Modify Connector settings:

- Android File browser tool installation: www.android.com/filetransfer
How to sign the UFT Mobile Agents for iOS Devices:
- Creating the Certificate and Provisioning Profile: https://admhelp.microfocus.com/uftmobile/en/2021-2021_R1/Content/iOSAssets.htm
- Sign the UFT Mobile Agents: https://admhelp.microfocus.com/uftmobile/en/2021-2021_R1/Content/MC_Enabler.htm?Highlight=ios%20enabler
How to Update ChromeDriver on the Connector:
- Go to Connector installation folder
For finding it on Mac machine run the below:
Finder-> Go to folder -> /opt/UFTMobile

- Go to Connector/chromeDriver folder and create new folder for each chrome version needed and place the chrome driver file under it
- Go to Connector/conf/chromeDriver.properties file and add new records for the new version added
- Restart the Connector and try