Visual Testing using Applitools
Ginger provides integration with Applitools visual testing . Visual testing is used for automated UI testing and monitoring. It helps to analyze entire application pages and report differences only visible to the human eye. Break down images into their layout and structure and automatically detect similar differences across different pages of your app running on different browsers and devices.
Prerequisites
- Applitools license
- Applitools server URL and authorization key
- Ginger version (4.2.0 and above)
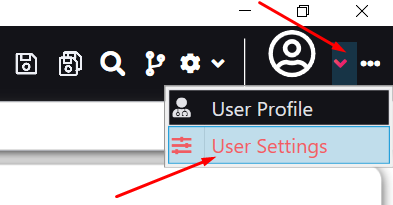
- Ensure 'Show enterprise feature' is selected & saved in Ginger under 'Users Settings option'

-
Applitools configuration
Please follow below steps for field configuration
- Go to: Configuration à External Integrationsà Applitools Configuration
- Configure Applitools server URL and key

Adding Visual validations in the flows
There are three steps for Visual testing in Applitool
- Open eyes- open the Applitools session
- Check Point – capture the current viewport image and perform visual validations. Multiple check points can be added between open and close eyes.
- Close Eyes – close the Applitools session and returns the results of checkpoints executed between open and close eyes
First, you must Add the Action for which web/windows/mobile you want to test
- Open Eyes
- Add Visual testing Action from Action Library


- Select Visual testing Analyzer as Applitool Analyzer.

- Select Applitool Action As Open Eye. Choose Application Screen size less than your screen resolutionBelow are supported resolution
Firefox is limited to 480
Edge is limited to 320
- In Applitool Test name work as batch name of all activity.

- Check Point
In Applitool Action we can select checkpoint in this action there are two type
- In Action By Dropdown select window it will check for whole screen.

- In Action By dropdown select as region it will ask for the perticular element which you want to compare on that basis you can choose the perticular element on page this will compare only that perticular element.

- Close Eye
- After all the checkpoints are added close eyes must be added to close the session and get the checkpoint results from Applitools to Ginger.

After Completion of Close eye you can get the Result image in to Screenshots Section.
Note : on first time it will create a baseline image and on that baseline image it will compare the latest image
Applitools Dashboard
On applitools dashbopard you will see the list of batches executed from Ginger. Batch name is same as the Test Name specified in Ginger.

Under each batch you can review the images and accept the baseline
For validating/ignoring specific part of the pages you can use applitools annotations to ignore specific regions e.g. ads are ignored in below image
